
Pillowy Soft Gooey Cinnamon Rolls
These are the softest, gooeyest cinnamon rolls ever!
Ingredients
Dough
- 1 Cup Buttermilk, room temp
- 2 Tbsp Sugar (35g)
- 1/2 Cup Sugar (100g)
- 1 1/2 Tbsp Instant Dry Yeast (14g)
- 1/2 Cup Salted Butter, softened (113g)
- 2 Large Eggs, room temp
- 1/2 tsp Salt
- 4 1/2 Cups All-purpose Flour (563g)
Filling
- 1/2 Cup Butter, softened
- 2 Cups Brown Sugar (roughly)
- 1/4 Cup Ground Cinnamon (Enough to dust the top of dough before rolling)
Icing
- 4 oz Cream Cheese, room temp (113g)
- 1 Cup Powdered Sugar (120g)
- 1/2 Tbsp Vanilla Extract
- 1 Tbsp Milk
Instructions
- Step 1: Wake Up the Yeast: In the bowl of your stand mixer fitted with a paddle attachment, hand whisk together the lukewarm buttermilk (aim for 110°F), 2 tablespoons of sugar, and the yeast. Let it sit and rest for about 5 minutes. You’ll know it’s ready when you see a thick, bubbly foam forming on the surface—that’s the sign that your yeast is alive and ready to grow!
- Step 2: In a separate bowl, combine your flour and salt. Set aside.
- Step 3: Combine the wet ingredients: Into your main mixer bowl with the yeast mixture, add the eggs, the remaining ½ cup of sugar, and your softened butter. I like to drop the butter in four parts to make sure it incorporates smoothly. Beat on medium speed until combined.
- Step 4: Build the Dough: Turn your mixer to low speed and start adding your flour half a cup at a time. Keep a close eye on it—you’re looking for that magic moment when the dough fully comes together and begins to pull away from the sides of the bowl.
- Step 5: The Knead for Speed (and Softness!): Switch out your paddle for the dough hook. Turn the mixer to medium-low and let it work its magic for 5 to 9 minutes. If you notice the dough is still acting a bit clingy and sticking to the bottom of the bowl, just sprinkle in a couple of teaspoons of flour until it behaves. You’ll know your dough is done kneading when it passes one of these two tests: The Bounce Back: Give the dough a firm poke with your finger. If it’s ready, it should spring right back up to meet you.The Windowpane Test: This is the gold standard! Tear off a golf-ball-sized piece of dough and gently stretch it between your fingers. You’re looking for it to become thin enough to form a "windowpane" where light shines through like a thin skin. If it tears before you can see the light, it’s not quite there—keep kneading
- Step 6: The First Rise: Give a large bowl a good coating of nonstick spray or a light rub of oil. Gently shape your dough into a smooth ball and place it right in the center. Cover the bowl with a clean kitchen towel and find it a cozy, warm environment to rest. Now comes the hardest part: waiting! Let it proof for about 2 hours.
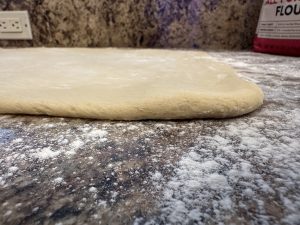
- Step 7: The Roll Out: Once your dough has finished its big rise, it’s time for the most satisfying part: give it a good punch right in the center to release the air! Turn the dough out onto a lightly floured surface and roll it into a large rectangle. Aim for a thickness between 1/4” and 1/2”—this ensures you have plenty of surface area for that gooey filling while still keeping the dough thick enough to stay pillowy.
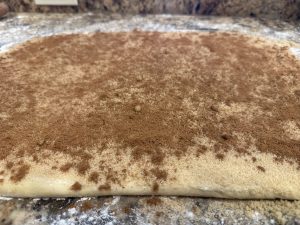
- Step 8: The Sweet Foundation: Take your softened butter and spread it generously across the entire surface of your dough rectangle. Next, spread on the brown sugar—you want to make sure no dough is peeking through! Aim for a nice, solid, thin layer of sugar from edge to edge. Finally, sprinkle the cinnamon until the whole thing is well-covered and smelling like a dream
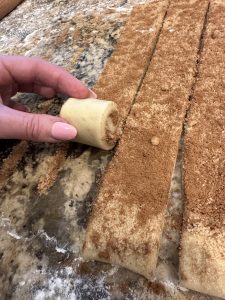
- Step 9: The "Pizza Cutter" Spiral: Grab a pizza cutter—this is the secret to clean, easy lines! Cut the dough into 1.5-inch strips vertically. Then, simply roll each slice upward until you have a nice, taut pinwheel. Place your rolls into a greased 9x13 pan, letting them sit side-by-side.
- The Final Rise (Same-Day Version): If you’re going to bake same day, go ahead and preheat your oven to 375°F. Cover your pan with a clean kitchen towel and let those rolls rise one last time for 1.5 to 2 hours.You’re looking for them to get big, fluffy, and crowded in the pan—remember, that crowding is the secret to the "squish"! Once they’ve doubled in size and look like they’re ready to burst with goodness, you’re ready to bake.
- Step 10: The "Two-Temp" Bake: To get that perfect contrast of a golden exterior and a pillowy center, we use a two-stage baking method:The Initial Blast: Start by baking at 375°F for 8 minutes. This higher heat gives the rolls a quick lift and sets the structure.The Slow Finish: Turn the temperature down to 350°F and bake for an additional 12 to 14 minutes.You’re looking for a beautiful, light golden brown finish. If you want to be precise, use a meat thermometer—the internal temperature in the very center of the pan should hit about 160°F.
If the mixture doesn't foam after 5 minutes, your milk might have been too hot (which kills the yeast) or too cold (which keeps it asleep). Make sure to use a thermometer to get that perfect 110°F for the softest rise possible!
Your butter will likely stay in small clumps and won’t fully emulsify with the liquid—it'll just slosh around in the bowl. That is perfectly okay! Those little buttery "sloshes" are exactly what you want; they will eventually work into the flour to create those rich, fat-marbled layers that make the rolls so incredibly soft.
If Baking the Next Day (The "Sleep-In" Method): Instead of baking right away, cover your 9x13 pan tightly with plastic wrap and place it in the refrigerator overnight.The next morning, take the pan out of the fridge and find a warm spot for them to rise. Let them proof for 2 hours—this gives the dough time to take the chill off and double in size. While they’re rising, go ahead and preheat your oven to 375°F.
Icing
- While your rolls are in the oven filling the house with that incredible cinnamon scent, it’s time to whip up the topping:Smooth the Base: In your mixer, beat the cream cheese on medium speed until it is completely smooth and free of any lumps.Mix the Rest: Add in the powdered sugar, milk, and vanilla extract.Whip it Up: Beat on medium speed until the icing is well combined, fluffy, and looks like a cloud.
- Patience is the last ingredient! Allow your rolls to cool in the pan for 20 minutes before you start frosting.
I like to put the icing in a piping bag and when I am ready to drizzle the icing onto the rolls, I microwave the icing for about 20 seconds and then just drizzle quickly over the rolls for that bakery look.